Monday, April 6, 2009

Final Project Experiment Day One Eliot Coven

Today in class I brought in 1/2 copper tubing. I started off by experimenting with making the dull surface shiny. So I tried sanding it with low grit paper and this made it a bit glossier then I used a high grit and this made it a bit more. I then used a Brillo pad. This made it very shiny. Finally I used a buffer which got the most shimmer. From now on I will use a Brillo pad at first and then the buffer to achieve the best finish. After its done buffing it picks up finger prints easily. I found that the best thing for that is just to get brass/ copper cleaner from the store and rub it on and clean it off (instead of going through the whole process again).
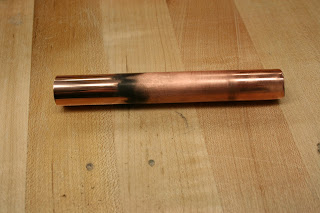


I then began looking at the best way to cut this material. Obviously the pipe cutters they sell in the stores work best but I don't have that sort of money and can get away with using the metal shop tools. The metal ban saw works alright but leaves a lot of bur and sometimes bends the piece. The horizontal ban saw works the best. I then took the shaggy piece and removed the bur with the grinder and attachment to the right of it.
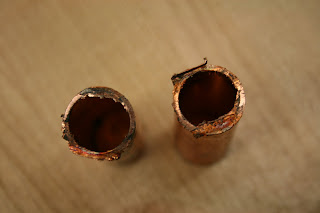


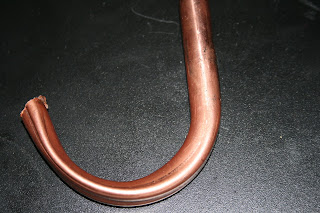
I finally looked at bending the copper tubes. I found out that they makes special bendable copper that is actually cheaper per square foot. I found this out because the more brittle copper simply snapped when Bryce and I bent it. I bought the other stuff and it bends fine. However, when I bend it it looses its round shape. I want to try filling the tube with sand or ice and trying that as well as looking at other tooling they make for achieving this bend.
For next class I am playing with copper etching using ferric chloride and muriatic acid. Intense stuff.

Jordan_Cork_Experiment 1


My first experiment involved testing the process in which layers of cork are glued on top of each other and set in molds to form complex curves. I cut 4" by 4" squares, applied Gorilla glue in between the squares, and then bent them between two paper cones using vice grips. The chairs above were made using a similar process. After seeing the results and if were to do this experiment over agian I would use a more sophisticated jig to form the shape. Weak points formed due to lack of pressure against the mold I used.

Fiber Glass experiment


So today during and after class i worked on my first experiment with this material. I found a scrap piece of yellow foam and vacuum formed styrene over top to get the female mold of a shape that had a sharp edge, small radii edge and a large radii edge. I did my first test with 6 minute epoxy and three full layers of glass. The 6 minutes was not long enough for me to take my time and apply multiple layers. However i did learn a lot from this. The long the set time the better. The more layers that i apply the stronger that the object will be. SO i went to Stanley's hardware after class and picked up two things of 2 hour epoxy. When i returned the first test was dry so i took that out of the mold. I reapplied the carnuba wax, which i am using as a release agent, to the mold. I mixed the epoxy and performed another test. This time i applied 6 or 7 layers and set it to dry. After about an hour i went to check on it and looks good so far. I am currently waiting for that to fully set. This test was successful. All of the edges were accurately formed.


The next test i will perform is the process of vacuum bagging. After watching videos online about this process and reading articles about it I don't think I am going to test sand bagging because many people say that vacuum bagging always gives better results. What i need to do for this is get a sheet of plastic that is large enough to cover my mold. Them i have to secure all side so they are air tight. Attach a valve to the bag that will allow this vacuuming action to occur. I'm hoping that i will be able to use something in the shop for this so i don't have to spend much money on this test. The purpose of vacuum bagging is to get all the spare resin out from in between the layers of glass top increase the strength of the form.

Mike Hummel's steel experimentations

I started my experimentations today with some bending of 22 gauge sheet metal. Easy to bend and work with. I moved on to welding after some simple 90 degree bends. After switching in some flux core wire I began testing different wattage and wire speed combinations as seen below.


The best one I found for sheet metal was a 1 wattage and about 50 speed as seen in top right. Since there was no argon gas I had to use the flux core and that's why some of my welds turned out so bad. (argon is used to shield the weld from the oxygen) After some practice I was able to weld a few like below.


Overall the sheet metal was hard to weld because there is a high risk of burning through the piece.


After some experimenting with the 22 gauge sheet metal I used the chop saw to cut some round tubing and then used the grinder to angle the edge so it would be able to fit together nicely on the side of another piece of round tubing. I then did some practice welds on the left side of the piece before welding the joint as seen below.

Since the weld was so awful looking again because of the lack of gas I decided to grind it down.

On wednesday I will be working with lower gauge sheet metal and more with thicker tubing. Hopefully there will be argon I can borrow but if not I'm going to use some anti-splatter spray.


Kev H Final Project

For my final project I am working with plaster. The 3 experiments I am doing will focus on how the plaster breaks down and attaches to other plaster parts after hardening, and how different shapes are made and what surface detail it can pick up.

For the first experiment I am going to carve out the plaster to see how it breaks apart after drying, and see what kinds of patterns or textures i can apply to it after hardening. For the second experiment, I am going to find out how to attach 2 dried pieces of plaster together, using wet plaster as the glue solution. Finally, i will find out how much surface detail plaster picks up from a mold and other materials.

Materials I will need:
-plywood/mdf
-plaster mix
-water
-carving tools
-bucket for mixing
-rubber for mold

Eliot Coven Final Project

For my final project I plan on using copper piping. There are several experiments I can work with on this project. The first and easiest is using th pipe bender to check out various radii that I can bend the copper into. I can get a feel for the maximum arc I can put in a piece and at what point it usually tears or cracks, as copper is brittle. I can also look at applying heat when bending and see if that gives me better results. Next, I will solder the copper. I bought a kit with solder and flux and I will try and teach myself the proper techniques. This is a great website for learning each step.
http://www.easy2diy.com/cm/easy/diy_ht_3d_index.asp?page_id=35749917
I also want to explore marking/ etching the copper. I really love the shimmer copper has and think that its surface is something that can be explored. I am going to look into polishing, sanding, sandblasting, and acid etching to give different finishes. This site is all about acid etching artwork. I will look into nitric acid and myriadic acid. http://www.instructables.com/id/Make-pictures-with-Acid-Etching/

Dave's Material

I am using chavant as my material.

Experiments:

1. Create shapes by using various tools. This will tell me what tools are best for what job. Shapes with sharp edges, rounded edges, and symmetrical.

2. Surface finishing- textures, smoothing, etc. Test various ways of smoothing chavant. Ex. Avon skin-so-soft, water, tools, etc.

3. Finishing with paint
Test different paint applications to achieve the finish that is most desired. Textured paint,
automotive, flat, gloss, and finding the best way to prepare for different types of paint.

Materials:

-chavant
-tools- rakes, etc. (buy or make)
-paint, primer, clear
-skin-so-soft
-sandpaper (wetsanding)

New Material for Experimentation

I have decided to change my material for the final project. I will now be working with PVC Piping. This material has been in common use since the 1950's and has a variety of applications, such as home construction. This material is widely abundant and cheep. Some pvc plastics are even recyclable. I plan to test how pvc reacts to temperature changes in its environment. I am interested to know its melting point, and at what temperature it becomes very brittle and cold. I would also like to tests its ability to bend under controlled pressure and tension. Finally, I would like to tests connectivity (i.e. how well it bonds with other surfaces such as itself) and what kind of chemical adherents (maybe apoxy resin) will help it bond most effectively.


Materials:

pvc piping
pvc connecting joints
heat gun
heat gloves
all materials needed to make jigs for bending pvc (coping saw and sand paper)
access to a home freezer or refrigerator
wire/rope for tension experiments
weld on
apoxy
metal ruler
Safety glasses

Sean's Final: Metal

I have always wanted to know how to weld and metalwork, but I have no experience. So my material to explore is steel.

The experiments I am interested in are:

Welding: I want to know how to weld different surfaces, like curves, corners, end to end, flat, etc.

Grinding: I want explore grinding to make welds look better, as a finishing technique, shaping, etc.

Shaping: I'd like to explore forming sheet metal into 3d shapes, through hammering, wheeling, bending, and/or rolling.

Sunday, April 5, 2009

cement

final: cement 
for my final material i chose to use cement 
first experiment: casting cement with an oil witch will tint the color of the oil, giving the cement a different color, also along with this experiment i will try to paint the cement with different kinds of paint to get different surface.
second experiment: see how small i can cast an object with cement so i am going to make a small mold out of plaster or alginate.
third experiment: i am going to mold an object by pouring cement on top of a surface to get its texture 

Final Blue Foam

Below are a few visuals of the blue foam project as it came to a conclusion. After applying a couple layers of spackle and paint, Greg crafted sanding jigs. This was helpful for sanding smooth, flat surfaces and even radii on the curves of the form. We then applied one final layer of paint with the spray gun and left the Wii controller to dry overnight. The surface still has some irregularities, most of which are due from handling the blue foam (transit, storage, manipulation, etc.). Unless we put a hard finish over the blue foam, I expect it will continue to get dented and dinged. This project has taught me the value of sanding blue foam meticulously before applying spackle and paint. This then makes for very little sanding a revising later on while in paint mode.


Re: Final Project

the materials I would use would be
Smooth-On 300 Series
mdf/wood
yellow foam
mixing cup
styrene

Final Project Proposal

The material I would like to use for my final project is liquid plastic. I will be using smooth-cast 300 series plastic. For my three experiments I would first like to use the vacuum former to make a shape and fill it with the liquid plastic to see how it dries and fills the inside of the object. For my second experiment I would like to add texture to the liquid plastic to see if the material can have a different finish besides smooth and shiny. For my last experiment I would like to rotocast and make a cup. I would like to see how much liquid plastic I would need to make the cup usable.

Carbon Fiber

After researching carbon fiber i discovered that the process to make something is very long. you have to make the negative mold because you want the smooth finished look on the out side. then you have to apply layers of mold release wax so the CF comes off the mold nicely after curing. One they wax has been applied you apply the CF. There are three different ways that the CF can be applied. Wet Laying, which is applying the CF dry to the mold and then pouring the epoxy on it and spreading it over all the CF. Another technique is Induction. the dry CF is applied to the mold and then placed in a vacuum bag. then the resin is sucked into the mold by the vacuum. The third technique is Pre-preg. In this technique the CF cloth itself comes pre-impregnated with a thin layer of resin. This cloth usually needs to be kept at a rather low temperature to keep it from hardening/bonding, and then when it is layed up and heated it hardens and bonds with the other layers of CF. The technique i will be using is wet laying because it seems the least difficult. With this technique i have to test two different ways of finishing it, vacuum bagging or sand bagging. Vacuum bagging is when you place the mold with the wet layed CF in a bag with a vacuum attached to it. This pulls the CF closer to the mold and giving you a stronger more accurate end product. Sand bagging is placing bags of sand on top of the CF in teh mold to keep it in place and apply some pressure. something else i want to test is when making a tube like form should i create the shape itself and wet lay over top the mold or make a two part negative and wet lay those parts and connect them. Finally i want to test to see if i can you blue foam for the molds instead of yellow foam or mdf.

Materials i am gonna need for this are:
MDF
Yellow foam
blue foam
mold release wax
carbon fiber
epoxy
vacuum bag
sand
plastic bags
and prob more once i start the experiments


http://www.vaglinks.com/Docs/Misc/CarbonFiberHowTo2.pdf

http://www.instructables.com/id/SIZU7BLF7AVJ8SD/

http://www.team-bhp.com/forum/technical-stuff/9521-pics-carbon-fiber-seat-how-handmade-fsae.html

Friday, April 3, 2009

Final Flashlight

Below are a few visuals of my final flashlight model. The finishing touches took much longer than I anticipated; particularly spray painting. I made the mistake of mixing different brands of spray paints and primers while painting which gave me mixed and disappointing results. I especially had problems with getting the chrome paint to dry. After several days of drying it was still "sticky" to the touch and would leave finger print indentations on the surface. Given this, I plan to go back and wet sand the surface and place another coat of primer and chrome paint (both complementary) and wait several days for it to dry. I plan to get a much better result.

Additionally, I made my flashlight functional by fixing a "punch-in" light on the top. I also made a cap that acts as an ambient glow lamp when the flashlight is not in use. Check it out.


Wednesday, April 1, 2009

Experimental Project Proposal: Wood Veneers

I have decided to explore wood veneers for this project. I've been wanting to try them out for a while, but have never had the opportunity. For the time being, I am more interested in how well they work on a smaller scale. There are entire stores full of different veneering supplies, so it is kind of difficult to figure out where to begin, but I am considering some tips from the following web sites:

http://www.joewoodworker.com/veneering/getting-started.htm

http://www.joewoodworker.com/veneering/no-vacuumpress-veneering.htm

http://www.diyinfo.org/wiki/Using_Veneers

http://www.prowoodworkingtips.com/Veneering_Index.html

Some experiments I would like to try are:

1.Simple, flat veneering. I might try this on a cut out shape to get a feel for application and finishing.

2.Vacuum Veneering, if the Vacuuform machine would work for this, I'd like to take advantage of that by trying it over a curved surface.

3. Bending veneers. What kind of angles and curves can I get different kinds of veneer over and what are the limits on the shape/angle before the wood breaks down?

4. Decorative. I am going to try out different things, such as laser cutting and staining. I would like to see what types of colorants outside of woodstains the veneer would accept. I've had good results staining cork with watered down acrylic, so I'd like to see how it works on veneer. I'd also like to see how well a laser cut peice would bend.

Figuring out what materials I need and don't need is a bit daunting, as there are so many out there, especially in regards to what type of glue I should use. Here is what I think I might need:

Veneer sample pack
MDF or other substrate
Appropriate glue
curved X-acto blades
glue roller
veneer softener?
paints

Carolyn's Project Proposal

Final Project: Fine Glass
Materials List:
• Fine glass
• Glue
o Epoxy
o Super glue
o UV glue
o Aquarrium bonding cement
• Solder
• Glass cutter
• Diamond cutter
• Miter
• Etching cream
• Heat gun
• Blow torch

Experiment One: Gluing
In this experiment I am going to try to find out what is the best type of glue to use for glue glass to glass. I would look into which glues are the strongest and which glues are clear and unnoticeable and which ones would leave a color residue and have bubbles that you would be able to see through the glass. In addition to this I would like to try to see if these glues are also good for gluing glass to other materials like wood or steal or if I different glue is needed when bonding these materials together. I plan on trying to use Epoxy, Super Glue, UV Glue, and Aquarrium bonding cement. I also want to try soldering two pieces of glass together to see if that works.

Experiment Two: Cutting
For this experiment I will be trying to see what is the best way to cut glass and what kind of cut you can make. I plan on using at least one type on glass cutter and possibly a diamond cutter. With these tools I want to see if you can only cut out straight lines or is curves and circles are also possible. In addition I will be testing to see if there is a minimum size you will be able to cut out.

Experiment Three: Etching
This experiment will test possible ways to etch into glass. I would like to see if any of the tools listed above also allow you to scratch into the glass without cutting it. Furthermore I want to see if you can etch into glass on the laser cutter. Last I want to try chemical etching into glass to what effect that gives.

Experiment Four: Bending
My last experiment if time permits is to test how much heat you need to bend a piece of glass. It till test how much of a bend you can get by heating glass with a blow torch. I also plan on seeing if a heat gun would heat the glass cut enough to bend the glass.

Jordan_Final Project_Cork Casting


This chair was made using a casting process involving granulated cork and epoxy. I would like to replicate this process with my three experiments. First I will make a mold of plywood. Pour the epoxy mixture into the mold and clamp it down. After removing the molded cork I will cut it to test its strength and flexibility. My final experiment will be to determine various surface finishes including wet/dry sanding and polishing.

Materials:
Granulated cork
Epoxy
Clamps
Drill
Screws
Plywood
Sand paper
Stirring stick
Wax

Final Yellow Foam Flashlight

Here is my finished flashlight. I'm really glad I finally got a chance to try the lathe, and I look forward to using spot putty with auto paints in the future, as they give such a nice, real plastic finish. I never would have known to use that stuff and can think of may projects for which I would like to get such an effect.

Mike Hummel's finished flashlight

After my flashlight dried on the outside I then painted the inside part under the lens a metallic gray. Here's a picture of my finished flashlight.

Mike Hummel's research on STEEL!

My process "experiments"

1. Bending
•Square tubing
Cut slits to bend
•Round tubing
Easier to bend in general
•Sheet metal
Easiest to bend

2. Welding (Mig)
• Square
Easiest to weld since it's rectalinear
•Round
May have to cut edge in C shape to attach pieces
•Sheet
If the gauge is too thin then it may melt through the sheet of metal.

3. Rolling
•Sheet
•Put bends in metal
Circular, elliptical, rectangles and unusual shapes.
•Grooves to interlock two pieces
V-grooves

Experiments.

I have decided to conduct research on programmable memory polymer. After "setting" this plastic 160F water, it was can be continually shaped, hardened and reshaped as the user exposes it to water of 100F. I plan to experiment with placing graphics on the surface of the polymer and observing what happens when that surfaces is stretched and contorted. Adittionally, I want to experiment with the polymer's strength as I bend and stretch it at varying lengths. Finally, I would like to consider how the polymer works when reshaped at different scales (large and small, thin and think, etc.).


Materials:

Hot water cooker
class cups
all necessary tools to build jigs for bending the polymer into specific shapes
inks
x-acto knife
metal ruler
spray paints
spray primers
use of the laser cutter to etch in graphics
cutting matte
safety glasses
chemical mask

Acrylic Experimentation

Experiment 1

-Heating

- Vacuum Forming thin acrylic to learn the properties of heating acrylic
- Push forming-Heat up acrylic and then try to push a shape through to get a smooth curve
- Use this knowledge to heat bend acrylic around an object to get an outline of the form

Experiment 2

-Laser Cutting/Etching

- Try variation of shapes and test the structural properties of the acrylic to see how thing of form are possible
- Etch different images into acrylic and see if it is possible to etch multiple layers

Experiment 3

-Finishing

- Try multiples textures including smooth, rough, and mirror
- Try different spray or paint on paints to see which works best

Plaster of Paris Material Explorations

I chose plaster of paris because I have never used it before and I'm familiar with cement and masonry. Here are the experiments I will be running to determine its properties. Obviously each experiment will be more detailed and thorough, however this is just the basics.

Experiment I: Casting a part using a mold

a.) find or make a mold, mix and pour plaster, let cure, remove from mold
b.) Materials: plaster, water, mold, mixing utensil

Experiment II: Series of adding foreign objects and materials

a.) mix and pour plaster, add objects while curing or over mold before pouring
b.) Materials: plaster, water, mold, different objects

Experiment III: Series of finishing techniques

a.) mix and pour plaster into simple mold for repetition, sanding, wet sanding, painting
b.) Materials: plaster, water, mold, sandpaper, spray paint

MATERIALS: Plaster of paris
Water
Rubber gloves
Mixing bucket
Mixing utensil
Acrylic paint
Acrylic primer
Styrene for molds?
Different objects for impregnating

Yellow Foam Flashlight

With this project I wanted to design a sleek, aggressive, and durable flashlight. The design references a bomb, more specifically from the WWII era. The button is on the end of the flashlight, and to turn it on and off, you simply hold the flashlight and bump the button on any surface for one hand operation.

After the final design was selected, I moved from paper to the lathe. This project was my first experience using the lathe. Turns out its a lot easier than I thought. Once I got the form almost perfect on the lathe, I sanded the rest by hand. Spot putty came next and after applying and sanding two coats, I moved onto primer. Four coats later I was ready for paint. The color scheme I chose was black and gold. I laid down two gloss black base coats before masking things off and subtely laying in some matte gold highlights. All in all this project was fun.


Flashlight progress

I didn't do the blog posts for the flashlight progress, but I'll describe my process.
First I sketched up the shape of the flashlight on paper. A unique feature in my design was an inside groove for the front of the handle. I then lathed the shape in yellow foam and used glazing/spot putty give it a smooth surface. I also made a styrene button. Then I sprayed it with primer, which revealed some imperfections in the surface. I went back and spot-puttied it again and primed it again until the surface quality was good. Then I masked off part of the flashlight and painted the front gloss white. The rest of it i mainted flat/satin black. I used an existing plastic lens from another project of mine for the lans of the flashlight.
I now like spot putty a lot better than spackel because it's more durable and gives a better surface finish.

Final Project Research

I've decided to experiment with casting smooth-on plastic. I plan to use Smooth-Cast 300 for the casting and Omoo 25/30 for the molds. My 3 experiments are:
- Rotocasting to make hollow shapes. I will make a cylindric or vase-like shape. I will discover how much plastic to use for a hollow part to achieve reasonable wall thickness.
- Testing detail quality. I will probably use an existing finely detailed object, make a mold of it, and cast it. I will compare the original piece to the casting to see how much surface detail it can preserve.
- Finishing/painting/pigmenting. I found out that Smoothcast 300 can be pigmented, so I will explore that as an alternative to painting. I also want to experiment with finishing techniques to achieve a variety of surface qualities: smooth, rough, glossy, matte, etc.
Materlais list:
SmoothCast 300
Oomoo 30
Spray release agent
plywood/mdf for mold box
mixing cups, etc.

Experimenting

For this final project we are required to use an unfamiliar material and test it within three different experiments. Acrylic is a material that most ID students have worked with and use often but isn't something I have used before. I have been intrigued by it because it can be heat bended, cut on the laser cutter, and finishing techniques/adhereing itself and other materials. Within each of the experiments it will be interesting to also work with different thicknesses of the acrylic. Knowing how this material works will be very important for my future in the ID program.

For the experiments:
1. Using the laser cutter I will see how well shapes can be cut into the acrylic. I would like to see how well round shapes as well as tight, straight cuts can be achieved. I also would like to work with etching, seeing how deep the etch can go as well as style of the etch.
2. Heat bending is another thing I have seen many other students doing. With the acrylic I would like to see how long it takes until it bends smoothly without cracking. Either working with the heat gun and the table heat bender. Also is it possible to use the vacuumform the acrylic?
3. Finishing on the acrylic will be important to see what materials I can use to either paint on or use to adhere. Different types of paint (spray, latex, acrylic, oil...) will be applied to the acrylic to see what sticks and what doesn't. For the adhesives I will try different types (Weld-on, acrylic glue, hot glue, elmer's, gorilla...) in order to see which will actually stick.

Hopefully these experiments will show me what works and what doesn't with acrylic. For my final project I haven't decided what to build yet but hopefully when I see what happens I'll be inspired.

Material experiments-Alex

My material I plan to experiment with is concrete.

Necessary materials
Concrete mix (Portland cement, agrigate, sand, water)
mixing bucket
some kind of mixer
mold making materials (Blue Foam, Press board, caulk, spackle)

Experiment 1-Stamping and molding concrete

In this experiment I will build a simple mold that will leave an exposed face that can be stamped at the proper time. I want to accomplish 2 things with this experiment. I want to find the smallest possible shape that the concrete will fill before it just backs up, and I also want to find out how easy it is to stamp the concrete.

Experiment 2-Coloring the concrete

Various methods of coloring concrete are available, from stain to color paste, and I plan on finding what works best.

experiment 3-finishing concrete

From filling holes to applying a sealer, I plan on learning all there is to learn about applying a finishing coat to concrete

Tuesday, March 31, 2009


after the primer was done i started with the spray paint fist i coated the whole this with the matt paint and after that was dry and done i put on painters tape and paper around the top piece so i could paint the gloss part without driping on to the matt

flashlight


Once the shape was finaly the way i wanted i put spot putty on it to smothen it out. I put a couple of coats and sanded them down to be ready for primer. After i got it smooth i placed about 3 coats of primer and sanded it with 600 grit and paper and also wet sanded it to get a better finish


This was my inspiration for my flash light design and the other is just an adjustment of the measurments. After making the measurments if the requirments i got my yellow foam and cut it down for the right size in order to use the lathe. Once that was ready i put i on the lathe to get the shape that i wanted

Matt's flashlight


My flashlight is finally finished. After i spot puttied and primed my light. i painted the whole thing flat black. Then i taped off the the flat black part and painted the light part chrome and the handle gloss red. Finally i put a gloss coat over the handle. While drying over night some wandering hands left a finger print on the gloss handle. So i then wet sanded it off and did another coat of gloss clear coat.

Jordan_Flashlight_Final


The flashlight project was a good learning exercise. This was the most enjoyable project yet and the one in which I learned the most. Using the lathe and spot putty were the two processes I gained from this project. I look forward to using spray paint and operating the lathe again.

Jordan_Flashlight Process_2


Jordan_Flashlight Process 1