Monday, April 6, 2009

Final Project Experiment Day One Eliot Coven

Today in class I brought in 1/2 copper tubing. I started off by experimenting with making the dull surface shiny. So I tried sanding it with low grit paper and this made it a bit glossier then I used a high grit and this made it a bit more. I then used a Brillo pad. This made it very shiny. Finally I used a buffer which got the most shimmer. From now on I will use a Brillo pad at first and then the buffer to achieve the best finish. After its done buffing it picks up finger prints easily. I found that the best thing for that is just to get brass/ copper cleaner from the store and rub it on and clean it off (instead of going through the whole process again).
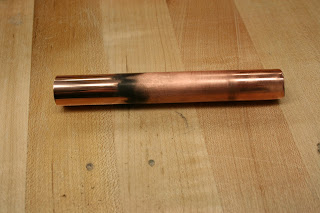


I then began looking at the best way to cut this material. Obviously the pipe cutters they sell in the stores work best but I don't have that sort of money and can get away with using the metal shop tools. The metal ban saw works alright but leaves a lot of bur and sometimes bends the piece. The horizontal ban saw works the best. I then took the shaggy piece and removed the bur with the grinder and attachment to the right of it.


I finally looked at bending the copper tubes. I found out that they makes special bendable copper that is actually cheaper per square foot. I found this out because the more brittle copper simply snapped when Bryce and I bent it. I bought the other stuff and it bends fine. However, when I bend it it looses its round shape. I want to try filling the tube with sand or ice and trying that as well as looking at other tooling they make for achieving this bend.
For next class I am playing with copper etching using ferric chloride and muriatic acid. Intense stuff.

Jordan_Cork_Experiment 1


My first experiment involved testing the process in which layers of cork are glued on top of each other and set in molds to form complex curves. I cut 4" by 4" squares, applied Gorilla glue in between the squares, and then bent them between two paper cones using vice grips. The chairs above were made using a similar process. After seeing the results and if were to do this experiment over agian I would use a more sophisticated jig to form the shape. Weak points formed due to lack of pressure against the mold I used.

Fiber Glass experiment


So today during and after class i worked on my first experiment with this material. I found a scrap piece of yellow foam and vacuum formed styrene over top to get the female mold of a shape that had a sharp edge, small radii edge and a large radii edge. I did my first test with 6 minute epoxy and three full layers of glass. The 6 minutes was not long enough for me to take my time and apply multiple layers. However i did learn a lot from this. The long the set time the better. The more layers that i apply the stronger that the object will be. SO i went to Stanley's hardware after class and picked up two things of 2 hour epoxy. When i returned the first test was dry so i took that out of the mold. I reapplied the carnuba wax, which i am using as a release agent, to the mold. I mixed the epoxy and performed another test. This time i applied 6 or 7 layers and set it to dry. After about an hour i went to check on it and looks good so far. I am currently waiting for that to fully set. This test was successful. All of the edges were accurately formed.


The next test i will perform is the process of vacuum bagging. After watching videos online about this process and reading articles about it I don't think I am going to test sand bagging because many people say that vacuum bagging always gives better results. What i need to do for this is get a sheet of plastic that is large enough to cover my mold. Them i have to secure all side so they are air tight. Attach a valve to the bag that will allow this vacuuming action to occur. I'm hoping that i will be able to use something in the shop for this so i don't have to spend much money on this test. The purpose of vacuum bagging is to get all the spare resin out from in between the layers of glass top increase the strength of the form.

Mike Hummel's steel experimentations

I started my experimentations today with some bending of 22 gauge sheet metal. Easy to bend and work with. I moved on to welding after some simple 90 degree bends. After switching in some flux core wire I began testing different wattage and wire speed combinations as seen below.


The best one I found for sheet metal was a 1 wattage and about 50 speed as seen in top right. Since there was no argon gas I had to use the flux core and that's why some of my welds turned out so bad. (argon is used to shield the weld from the oxygen) After some practice I was able to weld a few like below.


Overall the sheet metal was hard to weld because there is a high risk of burning through the piece.


After some experimenting with the 22 gauge sheet metal I used the chop saw to cut some round tubing and then used the grinder to angle the edge so it would be able to fit together nicely on the side of another piece of round tubing. I then did some practice welds on the left side of the piece before welding the joint as seen below.

Since the weld was so awful looking again because of the lack of gas I decided to grind it down.

On wednesday I will be working with lower gauge sheet metal and more with thicker tubing. Hopefully there will be argon I can borrow but if not I'm going to use some anti-splatter spray.


Kev H Final Project

For my final project I am working with plaster. The 3 experiments I am doing will focus on how the plaster breaks down and attaches to other plaster parts after hardening, and how different shapes are made and what surface detail it can pick up.

For the first experiment I am going to carve out the plaster to see how it breaks apart after drying, and see what kinds of patterns or textures i can apply to it after hardening. For the second experiment, I am going to find out how to attach 2 dried pieces of plaster together, using wet plaster as the glue solution. Finally, i will find out how much surface detail plaster picks up from a mold and other materials.

Materials I will need:
-plywood/mdf
-plaster mix
-water
-carving tools
-bucket for mixing
-rubber for mold

Eliot Coven Final Project

For my final project I plan on using copper piping. There are several experiments I can work with on this project. The first and easiest is using th pipe bender to check out various radii that I can bend the copper into. I can get a feel for the maximum arc I can put in a piece and at what point it usually tears or cracks, as copper is brittle. I can also look at applying heat when bending and see if that gives me better results. Next, I will solder the copper. I bought a kit with solder and flux and I will try and teach myself the proper techniques. This is a great website for learning each step.
http://www.easy2diy.com/cm/easy/diy_ht_3d_index.asp?page_id=35749917
I also want to explore marking/ etching the copper. I really love the shimmer copper has and think that its surface is something that can be explored. I am going to look into polishing, sanding, sandblasting, and acid etching to give different finishes. This site is all about acid etching artwork. I will look into nitric acid and myriadic acid. http://www.instructables.com/id/Make-pictures-with-Acid-Etching/

Dave's Material

I am using chavant as my material.

Experiments:

1. Create shapes by using various tools. This will tell me what tools are best for what job. Shapes with sharp edges, rounded edges, and symmetrical.

2. Surface finishing- textures, smoothing, etc. Test various ways of smoothing chavant. Ex. Avon skin-so-soft, water, tools, etc.

3. Finishing with paint
Test different paint applications to achieve the finish that is most desired. Textured paint,
automotive, flat, gloss, and finding the best way to prepare for different types of paint.

Materials:

-chavant
-tools- rakes, etc. (buy or make)
-paint, primer, clear
-skin-so-soft
-sandpaper (wetsanding)

New Material for Experimentation

I have decided to change my material for the final project. I will now be working with PVC Piping. This material has been in common use since the 1950's and has a variety of applications, such as home construction. This material is widely abundant and cheep. Some pvc plastics are even recyclable. I plan to test how pvc reacts to temperature changes in its environment. I am interested to know its melting point, and at what temperature it becomes very brittle and cold. I would also like to tests its ability to bend under controlled pressure and tension. Finally, I would like to tests connectivity (i.e. how well it bonds with other surfaces such as itself) and what kind of chemical adherents (maybe apoxy resin) will help it bond most effectively.


Materials:

pvc piping
pvc connecting joints
heat gun
heat gloves
all materials needed to make jigs for bending pvc (coping saw and sand paper)
access to a home freezer or refrigerator
wire/rope for tension experiments
weld on
apoxy
metal ruler
Safety glasses

Sean's Final: Metal

I have always wanted to know how to weld and metalwork, but I have no experience. So my material to explore is steel.

The experiments I am interested in are:

Welding: I want to know how to weld different surfaces, like curves, corners, end to end, flat, etc.

Grinding: I want explore grinding to make welds look better, as a finishing technique, shaping, etc.

Shaping: I'd like to explore forming sheet metal into 3d shapes, through hammering, wheeling, bending, and/or rolling.