Tuesday, April 14, 2009

Carolyn's 4th Glass Experiment


My final experiment is soldering glass pieces together to make stain glass. To do this you need copper foil that is sticky on one side to adhere to the glass. First you apply the copper foil to the edges of the two you want to solder together. You take the hanging over foil and fold the edges over to the top and bottom services of the glass. This copper is what the solder attaches to. In order to solder the pieces together you have to brush flux on the copper to clean it. You can then finally heat the soldering wire and solder the two pieces together. I have found that this process is both easy and difficult. The process itself is fairly simple but I have never soldered before so it is very challenging for me to create a smooth solder line. I think I want to use this method of joining the glass together instead of gluing because I think it would be beneficial for me to improve my soldering skills. Also as of now I am still not sure how to place the foil and solder edges together to make a right angle instead of just joining to pieces hat make a flat surface.

Jordan_Experiment 3_Cork


My final experiment with cork was the use of cnc technology to make a form. First I gluded and clamped the remaining sheets of cork I had used in previous experiments with gorilla glue. I then removed the grips and used the band saw to remove the mdf from the cork block and trim excess cork to make a square. Next, I measured the block and sketched a bowl-like design in solid works (with the help of Tom King..yea Tom King did everything in solid works). From there, the cnc machine milled the part. Next, I used the scroll saw to remove the cork that I did not need. The final steps involved the oscillating sander and sand paper to refine the piece.


Lycra Experiments

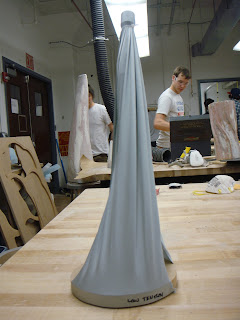
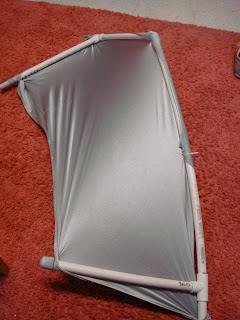
In yesterdays class I experimented with lycra fabric. I was curious to know if the fabrics properties would change with different degrees of stretch. To test this idea, I made PVC skeletons and wrapped the fabric around them in a variety of ways. The first sample shows how the fabric reacts to being stretched around a pointy object. Both side have different degrees of stretch to them. The one with high tension formed a larger number of smaller ridges, compared to the low tension side that formed fewer, larger ridges. In the second experiment I wrapped a piece of lycra around a cone. I was able to receive the highest tension with this method. The fabric has yet to fray or rip from the staples holding it to the side. Finally, I tested the fabrics ability to stretch over a large area. It secured the fabric with plastic ties and was able to make a smooth surface between both ends of the PVC form.


Carolyn's 3rd Glass Experiment


For my third experiment I tried to etch into the glass. Originally I was going to try to see if any of the cutters could etch into the glass without breaking it. Now that I have used the glass cutters and know that to cut the glass all the cutter does it scratch it and it snaps, I know this will not work to etch the glass without having to try it. My second idea, the first method I tried, was to chemically etch the glass. This is done by taking etching cream and painting it onto the glass. You can buy vinyl sticky stencils to cut into to achieve a cleaner, desires design. Once you paint on the etching cream you let it stand for 5 minutes and then rinse off with water. Although the cream worked, and etched into the glass, the difference was not as noticeable as I had hoped for. For this reason I tested putting the etching on two coats for one piece (10 minutes) and then for 20 minutes on a third piece. The results were all the same and no difference can be seen between the different chemical exposure times. Lately I tested the etching cream on colored glass and found the etching cannot be seen. The next method of etching a tried was on the laser cutter. I tried two etching, one with solid block letters and one with unlined blocked letters. When the laser cutter etched into the glass, the letters were a lot more noticeable then the letters done by the etching cream. The problem with the laser etching was that the glass chipped in places and I fear that if you tried to cut the glass after laser etching it would break though the etching because all the glass needs in a slight scoring to break.