Sunday, April 19, 2009

Experiment


The first experiment I did was with the vacuum form.  I took one 12"x12" sheet of 1/8" acrylic and attempted to form it over a piece of yellow foam.  With 3 trials the heated to the point where it sags down in the middle, when I release the pressure and let up the form the acrylic didn't get sucked down around the yellow foam.  Although I was unsuccessful I found the acrylic to be easily molded (and very hot).

I also tested the strength of different adhesives; Weld-on, Sobo glue, and wood glue.  After 24 hours the wood glue easily snapped off while the Weld-on and Sobo held strong.  With a little bit of applied pressure on them both had the Weld-on become detached and the Sobo glue was slightly flexible until it too snapped off.  I also sprayed flat white spray paint on one side of the acrylic to see how well it adhered.  The next day it held on strong while one side was flat white and the other glossy from the acrylic.  

Finally I used the laser cutter to see how it could etch as well as cut various shapes.  I set up shapes is small and tight curves as well as straight lines and points.  They laser cutter took 3 tries to fully cut through the 1/8" acrylic.  All of the pieces were cut with precision.

Final Flashlight

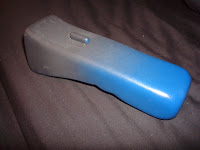
Here are some pictures that show the process I went through to create my final flashlight.

I started with sketches and when I came upon a final design went right away into sanding and forming the yellow foam into my desired design. When I was done I started adding the spot putty.  I applied many layers of the spot putty, sanding in 
between and priming with the spray primer.  My final finish was a flat black base coat that I faded into a glossy blue end.  The button
 I added was from a toy helicopter that I had. 

Progress on Final

Below are some visuals of how I plan to execute my final project. I have chosen to make an outdoor shelter that functions as a rain water catch system. This weekend I went to a fabric store and purchased some vinyl fabric material, chord and sewing equipment. Additionally, I ordered some plastic clips from an online survival shelter website. I can thread the vinyl through the clip which will then allow me to attach it to another material such as PVC pipe. I began working out the plans for what the shelter is going to look like. Here is a rough sketch of my idea. I also began to work on the stakes will help to hold the tent into place. Tomorrow I plan to begin measuring and heat bending the poles of the shelter using jigs.


Final Acrylic project proposal

For my final I want to make a table using the techniques I learned in my first couple of experiments. It will have a two piece top with the lower piece having the recesses for the acrylic rod legs to go into. The top will have minor indentations but only enough for it to be stable and will have an image etched onto the top. I am not sure of the image yet. The legs will be made out of acrylic rods and will be heat bent to angle into the places put in for them in the lower piece of acrylic. I am thinking about trying to get the legs to twist together and then fan back out for the legs but I am unsure if I will do that or not.

Materials-
16"x16" Clear 1/8th inch acrylic
16"x16" Clear or Black 1/8th acrylic
4 1" acrylic rods

Final Project: Fiber Glass


I plan on making an enclosure for my speakers in my car for my final project. Many people use fiber glass for this because it is very strong and can form to almost any shape. I have two 6x9 that will be installed into it and once this project is done i plan on installing it in my car. I will take the current cover out of my car to get he measurements and then create a form out of blue foam. Once i have the form, i will sand it and find the exact location of the speakers. Once i know that the speakers will fit, i will test it in my car to make sure it fits there. After everything is fine tuned and everything fits i will start the lay up. I plan on vacuum bagging this because i want it to be as strong as possible. I will be laying the 12 layers because that gave me a very strong form in my experiments. Also, i will create a form that doesn't have many complex sharp edges because they were tough to work with during my experiments.

Materials:
existing speaker cover
blue foam
shur form
sand paper
scrap blocks for sanding blocks
spackle
epoxy
hardener
cup(for mixing)
paint brush
respirator
latex gloves
exacto
glass
carnuba wax
rag(to apply wax)
high grit sand paper (waterproof)
primer
paint