Friday, April 24, 2009

Final Project Process: Wood Veneer Lamp


I started the lamp by making patterns and a mock up out of brown paper, which I measured in order to sculpt the base out of MDF.
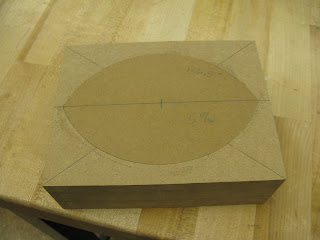
From those measurements, I made new patterns for the base, one slightly larger than the other so that the base would taper slightly. Then I made a rectangle from three layers of MDF and centered the patterns on it. I then shaped the base on various machines according to the patterns, which was more time consuming and difficult than I expected. When it was finished, I drilled the holes for the lamp components to go through.

After that, I realized that a curve on the surface of the base would create a nice wave shaped shadow when the light came through the veneer, so I drew the line I wanted on the pattern and traced it onto the base with a pattern tracing wheel.


Then I added a layer of MDF and shaped it again, and sanded in the curve. The hole for the light socket had to be re-drilled through the added layer.


Jordan_Final_Cork_Process


During my research I determined that I wanted to experiment with a seat design that had a shortened nose- a part of the seat I find to be particularly cumbersome. After removing a portion of the nose and adjusting the size of the rear section, I began welding the various cuts I had made on the bandsaw. I enlisted the help of Jeff Quintor, a veteran welder, for this step. We learned that the gaps were a bit too large, so steel strips were added for support. After welding I used the angle grinder to smooth the surface of the weld. Finally I placed the seat on the bike and went for a test drive. So far, so good.


Jordan_Cork_Final_Process


This is the first few steps of my final project. I began with an existing bike seat. I then removed the rubber cover and foam contents. From there I started bending and hammering the steel frame into a desirable shape.


Thursday, April 23, 2009

Tent Progress

Here are some shots of the progress that I have made on my tent during todays class. I focused on crafting the tent poles. To bend the poles into position, I first took the heat gun and ran it along the joint area, then bent the PVC around a wooden circle jig. Once all the pole were bend into place, I taped the bottoms together and mounted it against the bottom of a wall. This allowed me to make a template from paper for the vinyl fabric cover. I removed the cover, took apart the poles and sanded them down. They are now ready for primer and aluminum paint.


Wednesday, April 22, 2009

Mike Hummel's synth rack progress

Today I finished my welds on the rack and also drilled the holes that will be used to bolt the rack to my stand. I drilled a total of four holes; 1 vertical and 1 horizontal through the stand and rack on both sides. I also added a piece of sheet metal to the one side since my synth doesn't take up the whole length of the rack. This can be used to hold sheet music or my interface that connects my synth and keyboard to my computer. I grinded down all the joints followed by sanding of the entire piece and finally using Fantastic! to clean the remaining oil off. Now it's time for paint. Some pictures are below.

Jordan_Cork_Final


For my final project I will be designing a cork bicycle seat. Since cork is both moisture and bacteria resistant, I feel that a bike seat is an appropriate application. I plan to obtain an existing bike seat, modify the form by shortening the nose and widening the rear section, then covering the shape with layers of cork and glue. I plan to finish the bike by heat sealing clear PET over the cork.

Experiments on plaster


My first goal when experimenting with the plaster was to find out how well it retains the shape of the mold it was in. I used an old half gallon milk carton, and surprisingly the plaster picked up the majority of the details, down to the little bumps in the plastic. There were no bubbles in the mold either, because while the plaster sets you have to tap the sides of the mold to help release any trapped air.

My second experiment with plaster dealt with using carving tools to forge a shape out of a small block of plaster, and seeing what kind of detail i could get and keep on the surface of the plaster. This worked out really well and was actually surprisingly easy. The plaster is alot easier to shape when there is still moisture left from the mold, as time goes on and the moisture dries out, the plaster is more likely to crumble. I would say if you wanted to carve something, do it sooner than later after it comes out of the mold, as the moisture definitely makes it easier.


My final experiment with plaster was trying to get 2 separate pieces of plaster to attach together, using some kind of adhesive or the plaster itself. Adhesives failed, i tried hot glue, elmers, even apoxy, and all just flaked off after drying. The plaster also didnt work, it just didnt have the strength to hold the two pieces together. So ive concluded from this that if you want 2 pieces attached youre better off making a mold with the two pieces already combined.

Fiberglass final


Today during class I spread the epoxy onto the fleece covering. This will have to cure for about 12 hours before i can start to wet lay the glass. I plan on doing this friday morning so that it can fully cure by saturday morning and i can finish it all weekend. The process of sanding is going to take a long time becasue with the gloss finish i will have to get every imperfection out of it.

Final

For my final project, I am going to create a flower vessel that can either be placed on a deck rail, or a long a path. I am CNC'ing a negative mold that will be filled with concrete. Once the concrete cures, it is going to be gap filled, sealed, and finished.

Eliot Final Project Post


So everything went relatively smoothly on my jewelry box. The acrylic inside I cut on the laser cutter and weld-oned the pieces together very patiently. I made a compartment area on the top for little pieces of jewelry, it is removable. When you pull this piece out you see a large compartment underneath. The frame is made with 1/2 ID copper tubes. I cut them sanded, buffed them and then glued them together with 50 minutes epoxy. The cap for the project was made out of sheet copper. I cut it rectangular and then rounded the edges to match the tubular frame. I then used the acid etching to etch a very large coy fish into the face plate for the box. I bolted the face plate onto the box. The last five percent of my project is taking me way too long! All I need to do is rivet the hinges in place but I bought the wrong size rivets twice and am waiting on that to put the final touches on the piece.

Tuesday, April 21, 2009

Final Acrylic

For my final acrylic project I'm going to make a vase.  I'm going to use the heat from the vacuum form in order to melt the acrylic so that I can bend it into the shape that I want.  I'm either going to use a yellow foam or wooden structure to form the acrylic around.  Depending on how the clear acrylic looks I'll decide whether or not to put a painted finish on it. 

Fiberglass Final

Since my last post i have changed my process a little. I made that blue foam model to get the shape and form of my final. I have taken the measurements from that and have created another model. This model is framed out of mdf and covered with fleece to get an even uniform slope. I had seen this technique used many times in videos i have watched about fiberglass and now i understand why people do it. The fleece has stretching qualities that are ideal for this. This allows you to pull it over any shape/form staple it into place and stretch it to get any wrinkles out. So now that i have this form made i can move on to the next step, which is fiberglassing. I plan on putting a layer of epoxy down and letting that harden so i have a hard surface to glass over. Once the epoxy is hard i will start to lay the glass. I plan on doing 12 layers because this has to be strong and resist the vibrations of the speakers. Once the 12 layers are dry i will continue to the finishing process of sanding priming and painting. I am planning on a gloss finish. I dont know the exact color yet.


MONster Progress

Today was a big progress day for my final project. I began my morning by crafting the stakes that are oriented in the back of the tent. I measured and drilled holes so that they can be secured the tent poles as well as each other. Below are a few pictures of the pole and stake in action. I tested the stake's durability outside Hayward in both grass and sand landscapes. Following that, I sanded them down with varying grits to get a smooth surface which I them primed. I then wet sanded, sprayed them with two coats of aluminum Rustolium and left them to dry. In addition, I began to measure out the tent poles. I took inspiration form the form of the human hand to model the structure of my tent shelter. A visual below shows how I took string and places it along the bones in my hand to take measurements of where my joints. By scaling the measurements up to fit the size of my tent, I now have an accurate read on where, and at what angle, I need to heat bend the PVC poles. Next class I plan to lay down the template for the fabric cute out and begin more construction on the tent poles.


Monday, April 20, 2009

Carolyn's First Final Model Attempt


Here is my first attempt of my stained glass candle holder and the drawings that I based it on. I have very mixed feelings about it. The corners are still not right and therefore it is not something I can hand it. I am still pretty proud of it for my first attempt at making a stained glass object. I hoping that when I figure out how to do the corners right I can try to salvage this model, but I am not sure that’s going to be possible.

Mike Hummel's Progress

I've been out of class the last week due to an illness so this is my first post in a little while. I decided to build a rack that will hold my synth above my digital piano. The rack will attach to my stand that I already have for my piano. My current configuration:As you can see it's a little more difficult to play both instruments at once because of the way they are angled and on top of that I'm losing a lot of desk space. My rack will eliminate both of these problems.

So today I started making the rack with making some cuts on the chop saw and doing some welding and grinding to make the joints. Here is my rack so far:
It's a little hard to see but bsically it has 1" square tubing in the shape of 'C's on both sides and two .5" tubing running the length of the rack where the instrument will sit. I also made two little stoppers by bending sheet metal and welding it to the rack. These will hold the instrument in place since my rack is angled downwards. It is hemmed at the top so it doesn't cut my wrist when playing:

Weds. I will be bringing in my digital piano stand to do some drilling for bolts that will attach the rack to the stand.


Sunday, April 19, 2009

Experiment


The first experiment I did was with the vacuum form.  I took one 12"x12" sheet of 1/8" acrylic and attempted to form it over a piece of yellow foam.  With 3 trials the heated to the point where it sags down in the middle, when I release the pressure and let up the form the acrylic didn't get sucked down around the yellow foam.  Although I was unsuccessful I found the acrylic to be easily molded (and very hot).

I also tested the strength of different adhesives; Weld-on, Sobo glue, and wood glue.  After 24 hours the wood glue easily snapped off while the Weld-on and Sobo held strong.  With a little bit of applied pressure on them both had the Weld-on become detached and the Sobo glue was slightly flexible until it too snapped off.  I also sprayed flat white spray paint on one side of the acrylic to see how well it adhered.  The next day it held on strong while one side was flat white and the other glossy from the acrylic.  

Finally I used the laser cutter to see how it could etch as well as cut various shapes.  I set up shapes is small and tight curves as well as straight lines and points.  They laser cutter took 3 tries to fully cut through the 1/8" acrylic.  All of the pieces were cut with precision.