Wednesday, February 25, 2009

Eliot Coven's Group: Blue Foam Day Two Post


Today in class we finished up the final details to our Adobe Illustrator file and then plotted our Super Nintendo remote. Our piece is roughly 4 ft x 2 ft x 8 ". We bought 4 sheets of 2" blue foam and super 77ed them together, putting epoxy in as well. My team mates then glued our print out on top of the foam while I began laying and cutting out the buttons. We ended the class by cutting the gigantic piece on the ban saw. Next class we will continue to make progress and try and finish most of the body of our object. If we can do this than the following classes can be devoted to spackling and finishing the piece.
Blue Foam Class One Post


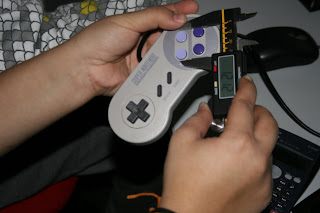
In the first class we chose our object. We considered doing the mouse for a computer but came to a decision that a super nintendo remote would be much cooler. The next step was to get as many pictures of the controller as possible and luckily Mike had a super nintendo in his room that we could measure and scale. We decided to lay the top view out on Adobe Illustrator. This took the majority of the class. In the next class we will plot our illustrator file and begin carving foam.

Monday, February 23, 2009

Vacuum Form Final Model


Here is my final model for the vacuum forming project. All the parts were done in 40 mm styrene. If I would have done something differently it would have been to use thinner gauge styrene for the connection lip, only because the radii were a little too tight for 40 mm.

Vacuum Form Progress


Here is what I was able to accomplish in class. I had to form one side of the mold twice because I got a bad pull on the first try. I am using two different mold heights which may cause some issues, but hopefully not.

Final Styrene Model


Here is my finished styrene model. At first I didnt account for any of the gauges of the styrene when measuring the pieces so I went through a few trial pieces before getting it right. Also, I forgot to add in some supports in different places to give it some structure so there were some tricky spots I had to slide some shims in. I'm not a huge fan of this material, mainly because its kind of a one shot deal when joining parts together.

Styrene Model Progress


This is my styrene model in progress. The thicker styrene is harder to get a clean cut, while the thinner gauges seem to turn out better when less weld-on is used.

Final CAT Cardboard Model Photos


Here is my final CAT Skid Steer Loader. The part which I found most challenging was rabbiting just enough space to get the cardboard flush.

Sunday, February 22, 2009

Mike Hummel's vacuum formed coin bank

After using 40 mil to vacuum form both halves I then attached them with using a small 40 mil strip. After they were attached I used spackle to fill in any cracks along the seam line. Unfortunately the spackle dried in an off white color when the styrene is bright white. I am now deciding if I should just spray paint the whole thing white or leave it how it is. Here are two pictures below.


finished model


the second try i decided to use a 20 mil for the inside strip so that my forms would not deform and they would fit better together and it worked i still had some gaps to fill with the spakle but it fit much better than the first one

after glueing the 2 pieces together i noticed that it fit in a weird way because the inside flap that i attached deformed one of my halves so i tried fixing the gaps with spakle but i wasn't satisfied with the result so i decided to try again and re do the whole thing 

Final Vaccuform

This is my finished vaccuform project. I found the paste to be very useful, but for the larger gaps I had to leave several hours for it to dry before I could start sanding. I used 40 mil styrene for the inside tape, which distorted the shape somewhat, but I was able to correct it by holding the peice together so that it set properly. Next time I would definitely use a thinner gauge styrene for the tape though.
Posted by Picasa

Vacuum Form Porject


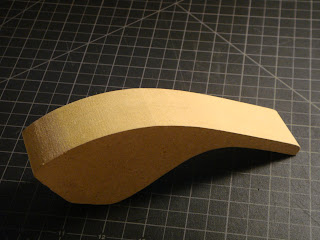
I have finished my vacuum form project. To complete the project I first cut out an abstract shape out of MDF. The only guidelines I used for making my shape was to make it have a flat bottom so that it could stand up. After I cut out the shape on the ban saw on Monday I sanded it smooth. Then I routered the edges. In class on Wednesday I split the two pieces of MDF apart and vacuum formed both pieces at the same time of out 40 mil. styrene. I then cut the shapes out with a xacto knife and used weld on and a strip of 20 mil styrene to stick the two pieces of styrene together. I then used spackling to fill the gabs and finally sanded the model smooth.

Vaccuform Progress


I first carefully sketched out a shape with various curves and angles on the double block of MDF, and cut the perimeter out on the small band saw, using relief cuts for the one tight curve. Then I filed and sanded the edges smooth with 80 grit, and chose a simple rounded edge bit for the router. The router wasn't able to completely get into the one interior angle, so I filed it slightly by hand. Then it was ready to be vaccuformed, which went pretty smoothly I think.


The styrene was trimmed from the mold and released, and I will be sanding, assembling, and finishing it today.

finished (kind of) vacuum form.


I'm all but done with the sanding on this project, but I have to run, so here it is glued up.

Friday, February 20, 2009

Canteen progress, final


I finished the canteen in class on wednesay. I was able to line up the two pieces very straight by sanding the connecting surfaces against a flat surface of sandpaper.

Jordan_Vacuform_Final


I started the project by glueing two pieces of mdf together with super 77. From there I drew a light flame-like shape on the mdf. I then cut the shape out using the bandsaw and scrollsaw. After the routing demo, I routed the edges to form a radius. I then sanded the mold to avoid any divits and scrapes. After separating the mold into two pieces, I vacuformed one side. My first attempts were unsuccessful so I tried again. The second time I waited a bit longer before pulling the lever and added 3 xacto blades to support the two thin areas at the top of my mold. This time I was successful- the two pieces looked great. Next, I cut the two pieces out and started sanding. When they aligned directly, I added a 1/4 inch support within the perimeter of each side and glue'd them together with weld-on. I finished by sanding rough areas and filling gaps with paste.

Jordan_Vacuform_Process


Thursday, February 19, 2009

I Finished Vacuuming


Here is my finished vacuum for model. Today in class I vacuum formed the two identical pieces and cut out the styrene. After sanding them down I aligned the sides and joined them with a strand of styrene running along the inside. I super glued pennies to the bottom of the frame to get the shape to rest the way it is show in the photo. I then sanded down a few uneven edges and called it a night.


Wednesday, February 18, 2009

Eliot Coven Final Vacuum Form Project


Today in class I finished the vacuum form project. I had my MDF cut-out from last class sanded and ready to go. I bought two pieces of 40 mil. styrene and after waiting in line for a reasonable amount of time I was able to vacuum form my two pieces seperately. Luckily I got everything right the first time. I then used a straight blade very carefully to score the edges and broke the styrene along my cuts. I sanded them flat, with the MDF still inside, with heavy grit paper and then used a much finer grit later. I inserted the inside support structure, tacking weld-on and clamping it as I went. I connected the two pieces slowly and applyed weld on liberally. I did not need to use putty at all. Finally, I gave it a finish sand along the seam. Overall, I'm very happy with the way it came out.

Alex Vacuum form progress


a few process shots as I blog from class.

Tuesday, February 17, 2009

Vacuum Forming Post 1


Here is my progress for day one  vacuum forming project. Unfortunately, I made several initial mistakes which I failed to document. I tried to form a "jelly bean" like shape out of MDF which proved far to difficult. After talking to several other students in the shop, I was informed that, due to the shape's thickness, the styrene would become very thin and breakable towards the bottom as it formed over MDF. I threw out the jelly bean shape and came up with a design that had  more manageable flat surface and flowing side edges. I glued the pieces together with super 77  then cut out the shape on the ban saw and sanded it down with the vertical sand belt.  I then split the two identical sides and used the router with an 1/8th in. bit to get a smooth radius around the edges of each form. Tomorrow I plan to vacuum form both parts, cut those parts out, sand them and attach them together with weld on. 


Styrene Final


This is my finished Styrene project. After it was all put together I sanded the edges and every surface with 400 grit to eliminate the glossy "trails" left by dripping weld-on. There was a 1/16th" gap that I filled in with quite a bit of paste, and it needed about 8 hours or so before it dried enough to be sanded down. I did enjoy working with this material.

Vacuum Form Progress


I worked in class and got all of the necessary steps done including the vacuuming of the object that I made.  I had used the vacuum form before during the Sprint Project with the assistance of the group but it was good to work with it some more and get some practice.  Both of my pieces came out nicely except for one of them had a slight slip of the penny but hopefully I will be able to work with it tomorrow.

Final Styrene Project


Here is my final styrene object. I had fun doing the project although I had some difficulties.