Friday, February 20, 2009

Canteen progress, final


I finished the canteen in class on wednesay. I was able to line up the two pieces very straight by sanding the connecting surfaces against a flat surface of sandpaper.

Jordan_Vacuform_Final


I started the project by glueing two pieces of mdf together with super 77. From there I drew a light flame-like shape on the mdf. I then cut the shape out using the bandsaw and scrollsaw. After the routing demo, I routed the edges to form a radius. I then sanded the mold to avoid any divits and scrapes. After separating the mold into two pieces, I vacuformed one side. My first attempts were unsuccessful so I tried again. The second time I waited a bit longer before pulling the lever and added 3 xacto blades to support the two thin areas at the top of my mold. This time I was successful- the two pieces looked great. Next, I cut the two pieces out and started sanding. When they aligned directly, I added a 1/4 inch support within the perimeter of each side and glue'd them together with weld-on. I finished by sanding rough areas and filling gaps with paste.

Jordan_Vacuform_Process


Thursday, February 19, 2009

I Finished Vacuuming


Here is my finished vacuum for model. Today in class I vacuum formed the two identical pieces and cut out the styrene. After sanding them down I aligned the sides and joined them with a strand of styrene running along the inside. I super glued pennies to the bottom of the frame to get the shape to rest the way it is show in the photo. I then sanded down a few uneven edges and called it a night.


Wednesday, February 18, 2009

Eliot Coven Final Vacuum Form Project


Today in class I finished the vacuum form project. I had my MDF cut-out from last class sanded and ready to go. I bought two pieces of 40 mil. styrene and after waiting in line for a reasonable amount of time I was able to vacuum form my two pieces seperately. Luckily I got everything right the first time. I then used a straight blade very carefully to score the edges and broke the styrene along my cuts. I sanded them flat, with the MDF still inside, with heavy grit paper and then used a much finer grit later. I inserted the inside support structure, tacking weld-on and clamping it as I went. I connected the two pieces slowly and applyed weld on liberally. I did not need to use putty at all. Finally, I gave it a finish sand along the seam. Overall, I'm very happy with the way it came out.

Alex Vacuum form progress


a few process shots as I blog from class.

Tuesday, February 17, 2009

Vacuum Forming Post 1


Here is my progress for day one  vacuum forming project. Unfortunately, I made several initial mistakes which I failed to document. I tried to form a "jelly bean" like shape out of MDF which proved far to difficult. After talking to several other students in the shop, I was informed that, due to the shape's thickness, the styrene would become very thin and breakable towards the bottom as it formed over MDF. I threw out the jelly bean shape and came up with a design that had  more manageable flat surface and flowing side edges. I glued the pieces together with super 77  then cut out the shape on the ban saw and sanded it down with the vertical sand belt.  I then split the two identical sides and used the router with an 1/8th in. bit to get a smooth radius around the edges of each form. Tomorrow I plan to vacuum form both parts, cut those parts out, sand them and attach them together with weld on. 


Styrene Final


This is my finished Styrene project. After it was all put together I sanded the edges and every surface with 400 grit to eliminate the glossy "trails" left by dripping weld-on. There was a 1/16th" gap that I filled in with quite a bit of paste, and it needed about 8 hours or so before it dried enough to be sanded down. I did enjoy working with this material.

Vacuum Form Progress


I worked in class and got all of the necessary steps done including the vacuuming of the object that I made.  I had used the vacuum form before during the Sprint Project with the assistance of the group but it was good to work with it some more and get some practice.  Both of my pieces came out nicely except for one of them had a slight slip of the penny but hopefully I will be able to work with it tomorrow.

Final Styrene Project


Here is my final styrene object. I had fun doing the project although I had some difficulties.  

Styrene Process


I got a few pieces cut out in class, but did not get to use the drill press so I used a jeweler's saw to cut the circles, then I sanded their edges. I found that much of what I had learned in jewelry classes proved useful for this project.


All of the pieces cut and their edges sanded before assembly.


Assembly process:


It was tricky to glue so many sides together at the same time to finish the piece because the weld-on evaporates quick and drips everywhere, but in the end I think it made the piece more structurally sound. It also prevented the problem of having all of the pieces fit together fine except for the last. There were little sections here and there that were not secured but adding more weld on with the needle bottle wasn't difficult.

Vacuum Form Project

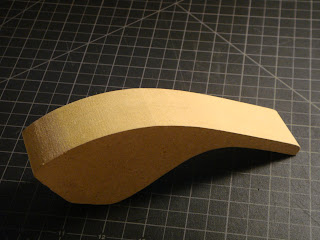
Here is a picture of my mold I will be vacuum forming. It spray mounted two pieces of 1/2 inch mdf together and then cut out my design using the band saw and then sanding it down with the disc and spindle sander. I then routered the edges to give a nice final appearance. I have some minor sanding to do on the sides before tomorrow.

Eliot Coven Vacuum Form Project Post 1


After I laid out my piece on 3/4 inch MDF, I sprayed one side of the wood with Super 77. I stuck it to another piece and stepped on it to secure it firmly for the time being. I then cut it out on the ban saw and then carefully sanded it down on the belt and circular drum sander. Once I had my shape I got a router bit with an interesting bevel in it and used it on the edges of my piece. I then gave it a final hand sand to make sure everything was smooth and even. Next class I plan on taking the two halves apart and vacuum forming each piece. I will finish by attaching them together and sanding the final piece down.

Vacuum Forming


Ive nearly finished the inner mold pieces, I just need to sand them down and get rid of any bumps.

Final Styrene Model


This is how my final styrene model turned out

Monday, February 16, 2009

I forgot to take pictures of the final styrene model, but here's where I am at with the vaccu-forming. I got the two mold pieces done, all that's left is to join them.
Posted by Picasa

Final Styrene Project


Here is my final product of the second M&P project involving styrene. I delicately placed all the pieces in their correct positions using weld-on. I used 40 point styrene for the entire shape with the exception of using 20 point for the piece that arks over the top of the circle. After all my joints had dried i went back and sanded down the rough edges with fine sandpaper to give it a smooth, finished look. This is how it turned out.


Sunday, February 15, 2009

Styrene project


Styrene progress


After my incident earlier, I got back to work, and got this far.

Blogging catch up.


some process photos from the cat project.

I would have some process photos for the styrene project, but unfortunately A) I screwed it up and B) I sliced my hand and spent a few hours fixing that up. will have those for the next post.

Eliot Coven Final Styrene Project


Here is my final styrene model. I made sure that after every piece was attached firmly. After that I measured everything one final time and all of my measurements were correct. I then filled in the only noticeable gap with styrene putty. I made sure everything was cleanly sanded. I'm pretty happy with the way it turned out.